Step 1
Sign Up
Found an API?
Sign up today to create your account and start exploring our powerful API offerings. It’s quick, simple, and completely free to join.
Once registered, you’ll gain instant access to comprehensive documentation, step-by-step integration guides, and sandbox environments to help you test and build with confidence.
Whether you’re developing your first application or scaling an enterprise solution, getting started has never been easier.

Step 2
Register an application
Dive into our full range of APIs and discover the possibilities for your next project. Whether you’re building a new product from scratch or enhancing an existing application, our APIs give you the tools to innovate faster.
Browse through detailed documentation, explore real-world use cases, and identify the APIs that best fit your needs. From account management and payments to authentication and data insights, you’ll find solutions designed for scalability, security, and seamless integration.
Leverage these APIs to quickly create robust, fully featured applications that deliver exceptional user experiences and meet industry standards.

Step 3
Explore Our APIs
Dive into our full range of APIs and discover the possibilities for your next project. Whether you’re building a new product from scratch or enhancing an existing application, our APIs give you the tools to innovate faster. Browse through detailed documentation, explore real-world use cases, and identify the APIs that best fit your needs.
From account management and payments to authentication and data insights, you’ll find solutions designed for scalability, security, and seamless integration.
Leverage these APIs to quickly create robust, fully featured applications that deliver exceptional user experiences and meet industry standards.

Step 4
Conceptual Guide
Gain a clear, high-level understanding of the essential principles, architecture, and workflows that power Open Banking. This guide walks you through the core concepts behind secure data sharing, API-driven connectivity, and regulated third-party access, helping you see how all the pieces fit together.
You’ll learn how various components interact—from user consent and authentication flows to payment initiation and account information retrieval—and how industry standards like PSD2, OAuth 2.0, and OpenID Connect shape the ecosystem.
Whether you’re new to Open Banking or seeking to deepen your strategic knowledge, this guide provides the foundation you need to design, implement, and scale compliant financial solutions.
Developer Guide
This guide is designed to help developers quickly understand, build, and maintain projects with clarity and efficiency. Whether you’re just getting started or contributing at an advanced level, the guide provides a structured reference for setup, coding standards, architecture, and best practices.

How to install the API
Step 1
Login or Registration
- The third-party (trusted partner) will access the Open Banking API Portal.
- If they already have an account, they can log in directly.
- If not, they will need to register by clicking the "Register" button to create an account.

Step 3
Token API
- The developer navigates to the API Explorer section.
- There are two categories:
- AISP (Account Information Service Provider)
- PISP (Payment Initiation Service Provider)
- To access any other API, the developer first executes the Token API to obtain an access token.
- Process for Token API:
- Select AISP or PISP from the available categories.
- Click on "Authorize". A form will appear where the developer provides the Consumer Key and Secret Key.
- After submitting, the API returns the Access Token, which is needed to access further APIs.

Step 5
Authorize API
- The developer executes the Authorize API.
- Provide the necessary payload as shown in the API examples.
- Upon successful execution, the consent status will change to "Authorized".

Step 2
Get Credential
After logging in:
- The developer (trusted partner) will create an application within the portal.
- Application credentials, such as Consumer Key and Secret Key, will be generated.
- These credentials will be required for API authentication.

Step 4
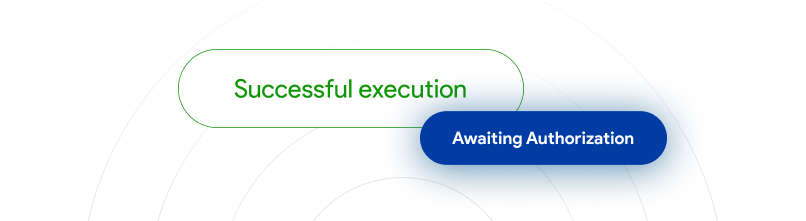
Create Consent API
- The developer accesses the Consent API:
- For AISP: Account Access Consent API
- For PISP: Domestic Payment Consent API
- The developer must include the Access Token in the request header.
- Upon successful execution:
- A Consent ID (Intent ID) will be generated.
- In the Consent Management system, the consent will be marked as "Awaiting Authorization".
Step 6
Token Exchange API
- The developer uses the Authorization Code received from the previous step.
- By executing the Token Exchange API:
- A new Access Token is issued.
- This token will encode the Consent ID (Intent ID), allowing secure access to APIs.

Step 7
AISP and PISP Service APIs
- To access the actual Open Banking APIs (AISP or PISP), the developer includes the Bearer Token (received in the Token Exchange step) in the request header.
- The Consent Management system validates the request checks if the consent is still valid, not expired, and exists.
- Once validated, the trusted partner can successfully retrieve data from the bank's Core Banking Services through the APIs.